Okay, you’ve gotten RStudio installed and linked up with GitHub. You’ve gotten started with RMarkdown, and you’re ready to use it to write all of your academic documents so your work will be reproducible. The next step is to get an academic website to display your work—even your early, early work—online. Conveniently, we can use RStudio, GitHub, and RMarkdown to do that, too!
Before we start, you might be asking yourself why you’d want to get your work online. David Robinson, Chief Data Scientist at DataCamp has done the best job I’ve seen articulating the answer to just this question. In short, he argues that putting your work online gives you practice communicating your research (blog posts are a great way to get that difficult first draft written); provides a way to get quick feedback; and attracts an audience to your work that can include future collaborators and even employers. Most importantly, it lets you teach people at a scale you’re not likely to reach any other way. Anyway, you should read his whole post on the value of blogging your work with data.1 You really do want to do this.
Building Your Own Website in Ten Easy Steps
Ten steps seems like a lot, but they’re seriously easy.
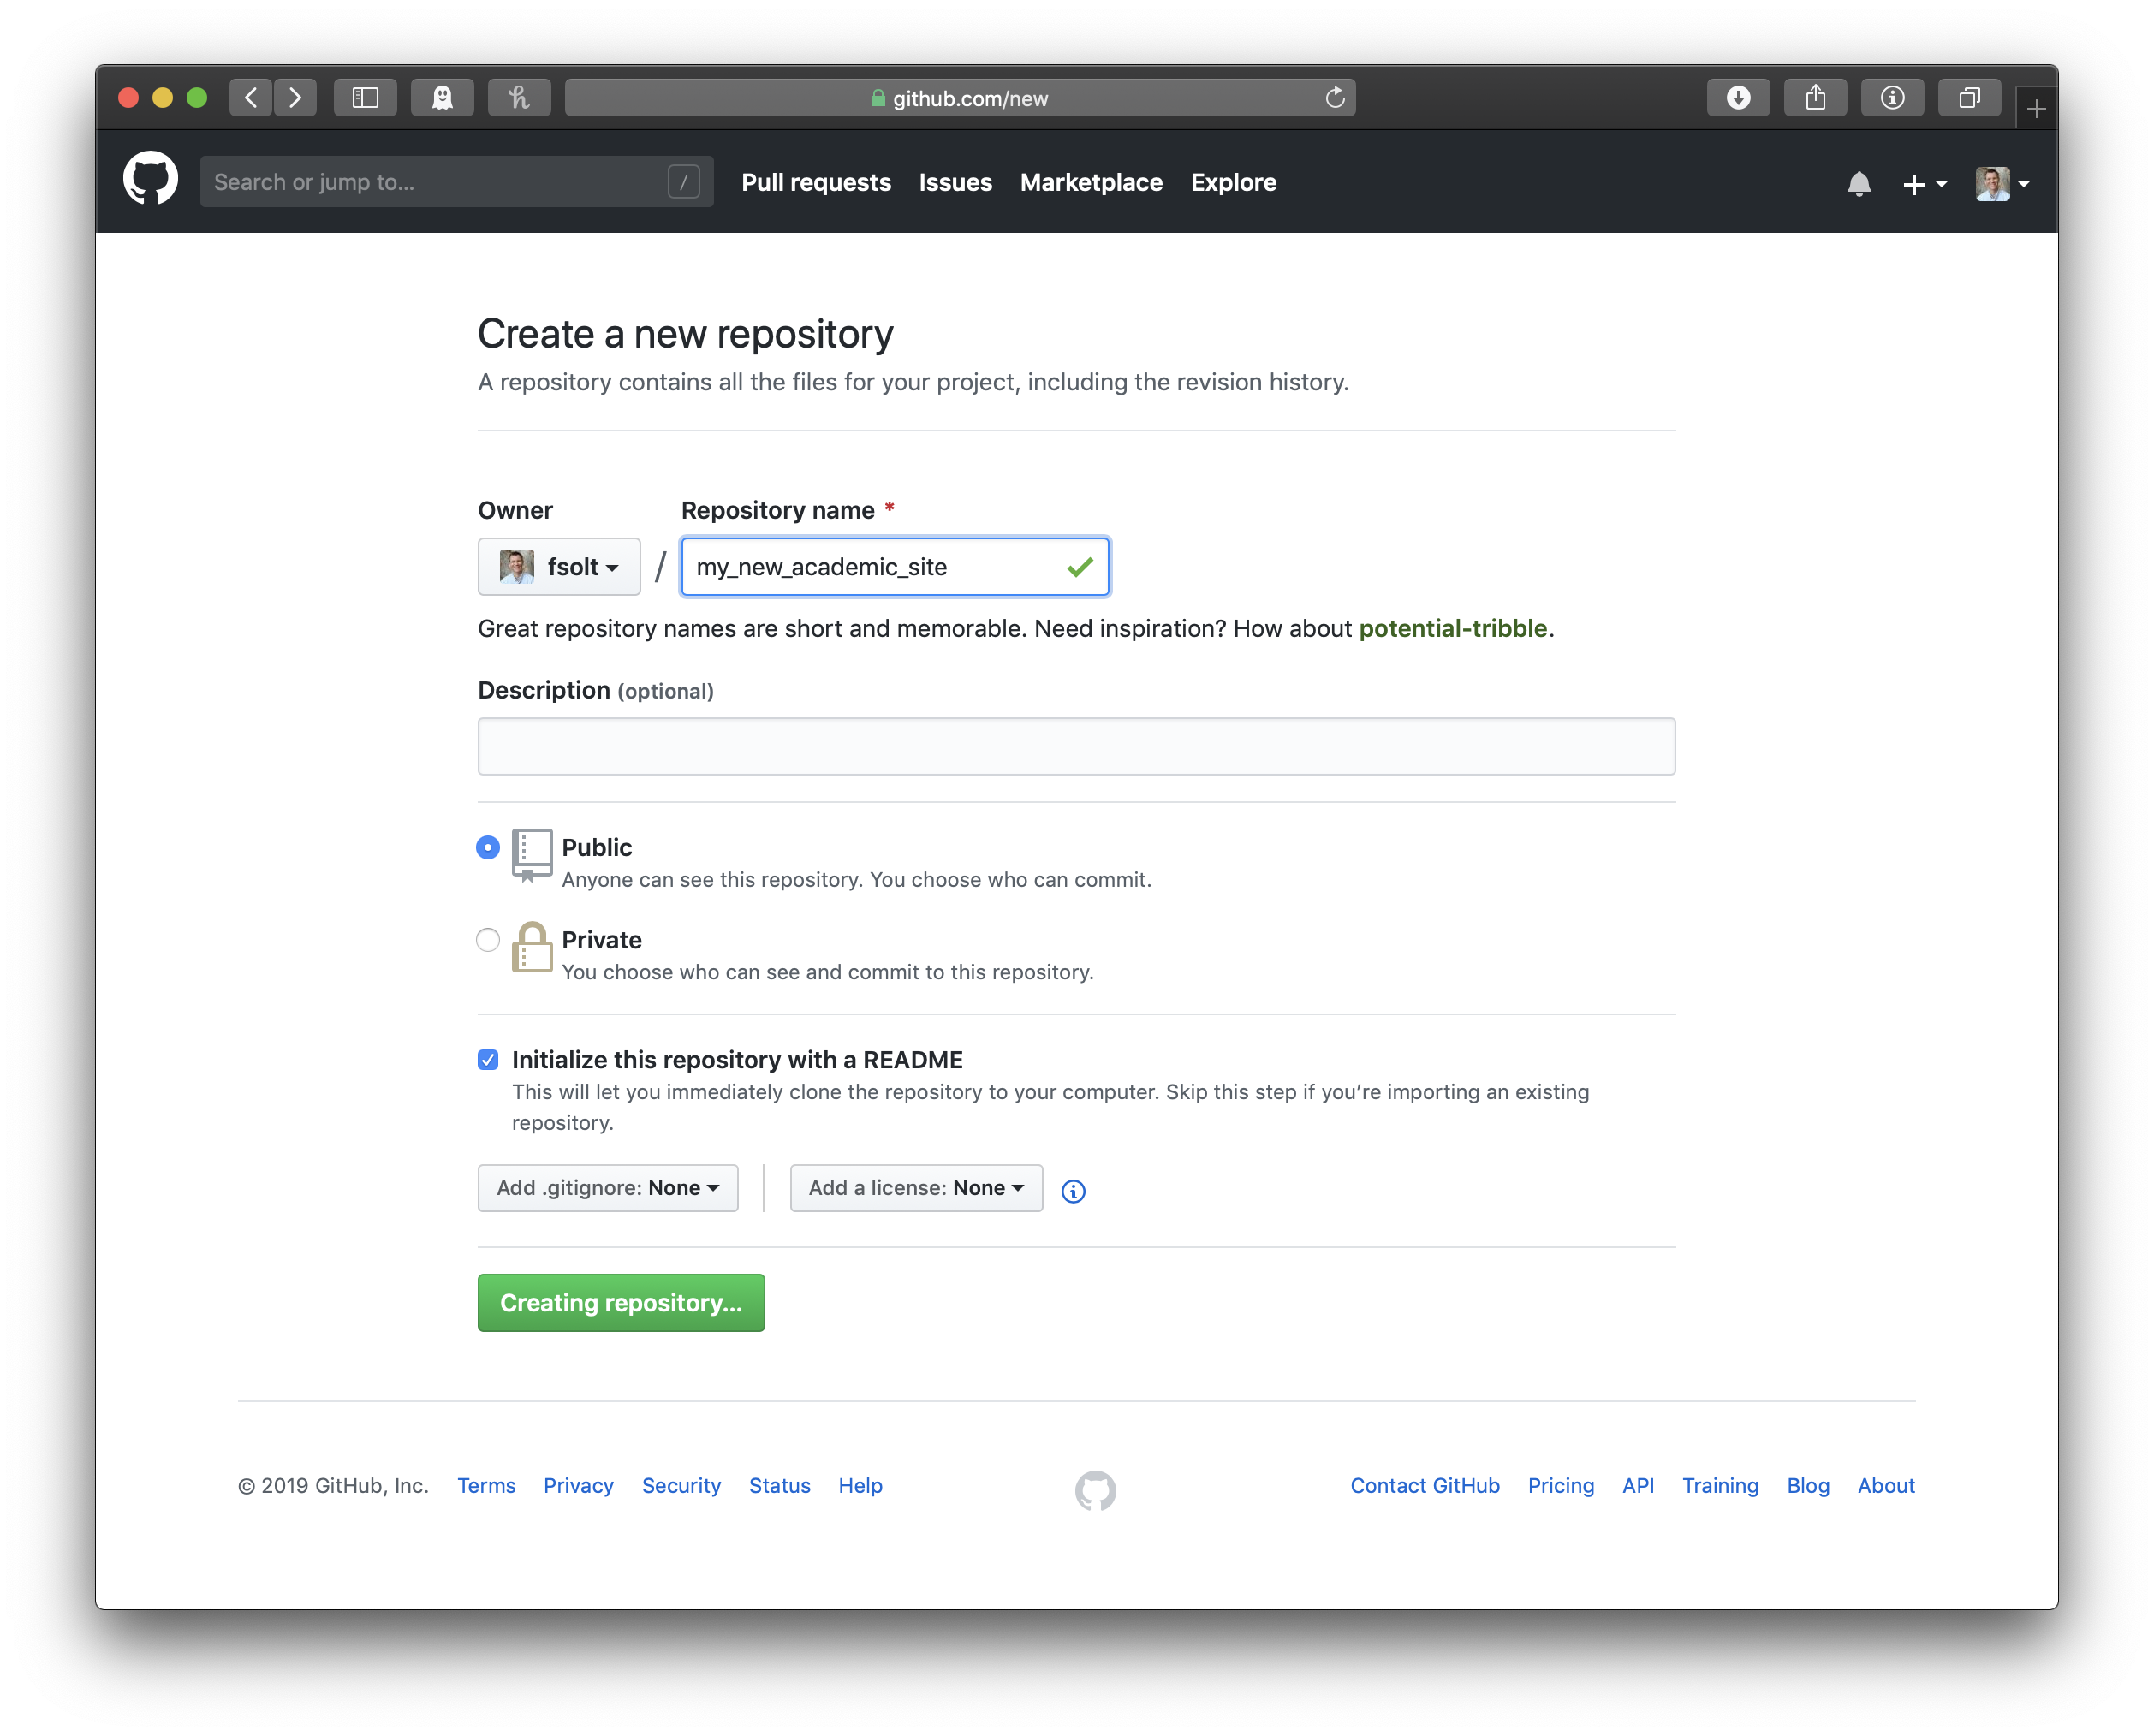
We start by creating a new project repo on GitHub and opening it in RStudio (you remember how to do that, right?). Call it whatever you like; the name won’t be important, as long as you remember it.
The R package we need for this task is called blogdown, which is built on top of a framework for building websites called Hugo. Install them both by typing this into the console, in the bottom left pane of RStudio:
install.packages("blogdown")    # install the blogdown package
blogdown::install_hugo()        # install Hugo (a function in the blogdown package)
In the lower right pane of RStudio, you’ll see the Files tab; as advertised, it provides an alternate way of browsing through your files. The first file listed in your new repo should be called .gitignore. More truth in advertising: this file is where you list documents for this project that you don’t want to save in the project’s git (and, in turn, GitHub) repo. Open it up and paste in the following:
.Rproj.user
.Rhistory
.RData
.Ruserdata
.DS_Store
Thumbs.db
blogdown/
public/
The first four lines were already there, the fifth and sixth are irrelevant system files on Macs and Windows machines respectively, and the last two are directories (that is, folders) that blogdown uses that we don’t need backed up.
Now we’re ready to build the site. There are a ton of different Hugo themes, but as I’ve mentioned before, I’m super-fussy, so I made my own, which we’ll be using here. Let’s get started:
blogdown::new_site(theme = "fsolt/hugo-prof", theme_example = TRUE)Building the site also automatically starts serving it locally–a tiny rendition of our site pops up in the lower left pane of RStudio, in the Viewer tab. Later, you can start serving the site by clicking on RStudio’s Addins button (right at the top of the window, under the title bar) and selecting “Serve Site.” Anyway, back in the Viewer tab, at the top left, go ahead and click on the little square with an arrow to “Show in a new window.” It’ll pop up in your browser, and it should look, ah, vaguely familiar. Anyway,
new_sitealso created a bunch of files, so we should commit them to git and push the changes to GitHub. Go to the Git tab in the upper right pane of RStudio, click on the “Staged” checkboxes next to each file, and hit the “Commit” button. In the upper right of the review-changes window that pops up, type a message that tells what this commit ‘will’ do compared to the previous commit: “add hugo-prof theme” does the trick here. The idea is to provide enough information so that you will later be able to scroll back through the commit history and identify the point in time you’re looking for. Then hit the “Commit” button to save your changes to your repo on your machine. Close the pop-up, and then hit the up-arrow button that says “Push.” That sends your changes to your repo on GitHub. (Sorry, you knew all this already. Ah, well, repetition does help sometimes, I think.)
This approach, otoh, will probably make “future-you” say things about “current-you” that are really mean.
Hugo allows you to customize themes using the config.toml file. So click the Files tab (again, that’s in the lower left pane), open the config.toml file, and let’s get your page set up better for your needs. Here’s what that file holds:
baseurl = "http://example.netlify.io/"
relativeurls = false
languageCode = "en-us"
title = "Your Name"
theme = "hugo-prof"
googleAnalytics = ""
disqusShortname = ""
ignoreFiles = ["\\.Rmd$", "_files$", "_cache$"]
uglyURLS = false
enableEmoji = true
blogdir = "blog"

[permalinks]
    post = "blog/:year/:month/:day/:slug/"

[[menu.main]]
    name = "Home"
    url = "/"
    weight = 1
[[menu.main]]           # comment out this row, plus the name, url, and weight to omit
   name = "Research"
   url = "/research/"
   weight = 2
[[menu.main]]           # comment out this row, plus the name, url, and weight to omit
   name = "Teaching"
   url = "/teaching/"
   weight = 3
[[menu.main]]           # comment out this row, plus the name, url, and weight to omit
    name = "Blog"
    url = "/blog/"
    weight = 4
[[menu.main]]
    name = "CV"
    url = "/cv.pdf"
    weight = 5

[params]
    description = "Your name and a few keywords on your academic interests"
    subtitle = "A few keywords on your academic interests"
    home_text = "A paragraph or so of professional bio.  Write it in the config.toml file---it's called home_text---as one long string."

    author = "Your Name"
    dateFormat = "2006/01/02"
    email = "your_email@uppermidwest.edu"
    github_username = "your_github_username"
    twitter_username = "your_twitter_username"  # leave empty quotes to omit
    gscholar_code = "your_gscholar_code"        # leave empty quotes to omit

    page_color = "white"
    text_color = "black"
    link_color = "rgb(0, 0, 152)"
    hover_color = "rgb(255, 102, 0)"


    # options for highlight.js (version, additional languages, and theme)
    highlightjsVersion = "9.12.0"
    highlightjsCDN = "//cdnjs.cloudflare.com/ajax/libs"
    highlightjsLang = ["r", "yaml"]
    highlightjsTheme = "github"

    MathJaxCDN = "//cdnjs.cloudflare.com/ajax/libs"
    MathJaxVersion = "2.7.5"
Right off, you’ll want to change the
titleof the site (line 4); thedescription,subtitle, andhome_text(lines 38-40); plus theauthor,email,github_username,twitter_username, andgscholar_code(lines 42-47). As the comments in the file tell you, if you don’t yet have the twitter (if not, I really think you should give it a try) or a Google Scholar account (it’s probably too soon for you to have one of those, otoh), you can leave the quotes empty and the link for them will disappear. After you’ve made the appropriate changes, save the file. Check out the site in your browser—it should show your changes. Save, commit (“add personal info” is a fine message), and push.There’s a lot more you can do to customize your site in the config.toml file. See the five
[[menu.main]]items? They are at lines 16-35 of the file. They specify the links that will appear in the sidebar to navigate your site. You can use hashtags to ‘comment them out,’ that is, to make them appear to be comments for humans rather than actual code. While we’re here, let’s comment out the teaching and research links to make them disappear. Of course, when you are further along in the program and have more to share on these fronts, delete the#s and bring them back. And then if you’d like to add another item to the sidebar, maybe a dedicated page for your dissertation or some other big project, you can do that easily: just add four lines for it, starting with[[menu.main]]and including aname(what you want the link to say),url(where you want the link to go), andweight(where in the list you want the link to appear). Save, commit (“revise sidebar”), and push.My color preferences are, um, maybe somewhat idiosyncratic, and you doubtless have your own in any event. You can change the colors of the page here, too, using the
page_color,text_color,link_color, andhover_colorparameters (lines 49-52 in the file). These parameters accept any color that HTML does, so you can specify a name, a hex code, an rgb value, whatever. Plugging in the following, for example, will give your page a Hawkeye makeover:page_color = "#f0f0f0" text_color = "#424242" link_color = "black" hover_color = "#fcd116"Save to preview the results in your browser, commit (“change to Hawkeye color scheme”), and push.
Time for content. Intuitively enough, Hugo puts that in the
content/directory. Remember the CV you learned to make for yourself last week in RMarkdown? Right now, your site is showing the one Steven V. Miller made for William Sealy Gosset. Since you’re a student, not the Student, you’ll want to change that right away. This is a two-step process: (1) put your CV file, “SoltCV.pdf” for example,2 in thecontent/directory, and (2) change the url under the[[menu.main]]item for the CV in the config.toml file at line 34 from"/cv.pdf"to the name of your CV file, keeping the slash (and the quotes). Commit (“replace CV”) and push.David Robinson’s got you all fired up and ready to blog about your data? Good! Click the “Addins” button again (remember, it’s just under the title bar) and select “New Post.” A pop-up will appear with blanks for the title of the post and so on. Be sure to choose the RMarkdown format so you can include R code and output. The
hugo-proftheme will put your post at the top of the blog page, with older posts appearing reverse chronologically below. Each post also has its own dedicated page, linked from the main blog page via the post’s title. As you work on the post, save regularly, commit, and push. Each time you save, the locally served version of your website will update in your browser so that you can see exactly how your page is going to look.When you’re ready to have separate pages for your research and teaching, first remember to uncomment the relevant lines in the config.toml file that we commented out above. Then, you’ll need to edit the file
content/teaching/_index.Rmdto add your teaching interests, experience, and courses taught andcontent/research/_index.Rmdto add your research interests, projects, conference presentations, working papers, and publications.
And we’re done!
Publishing Your Website Using Netlify
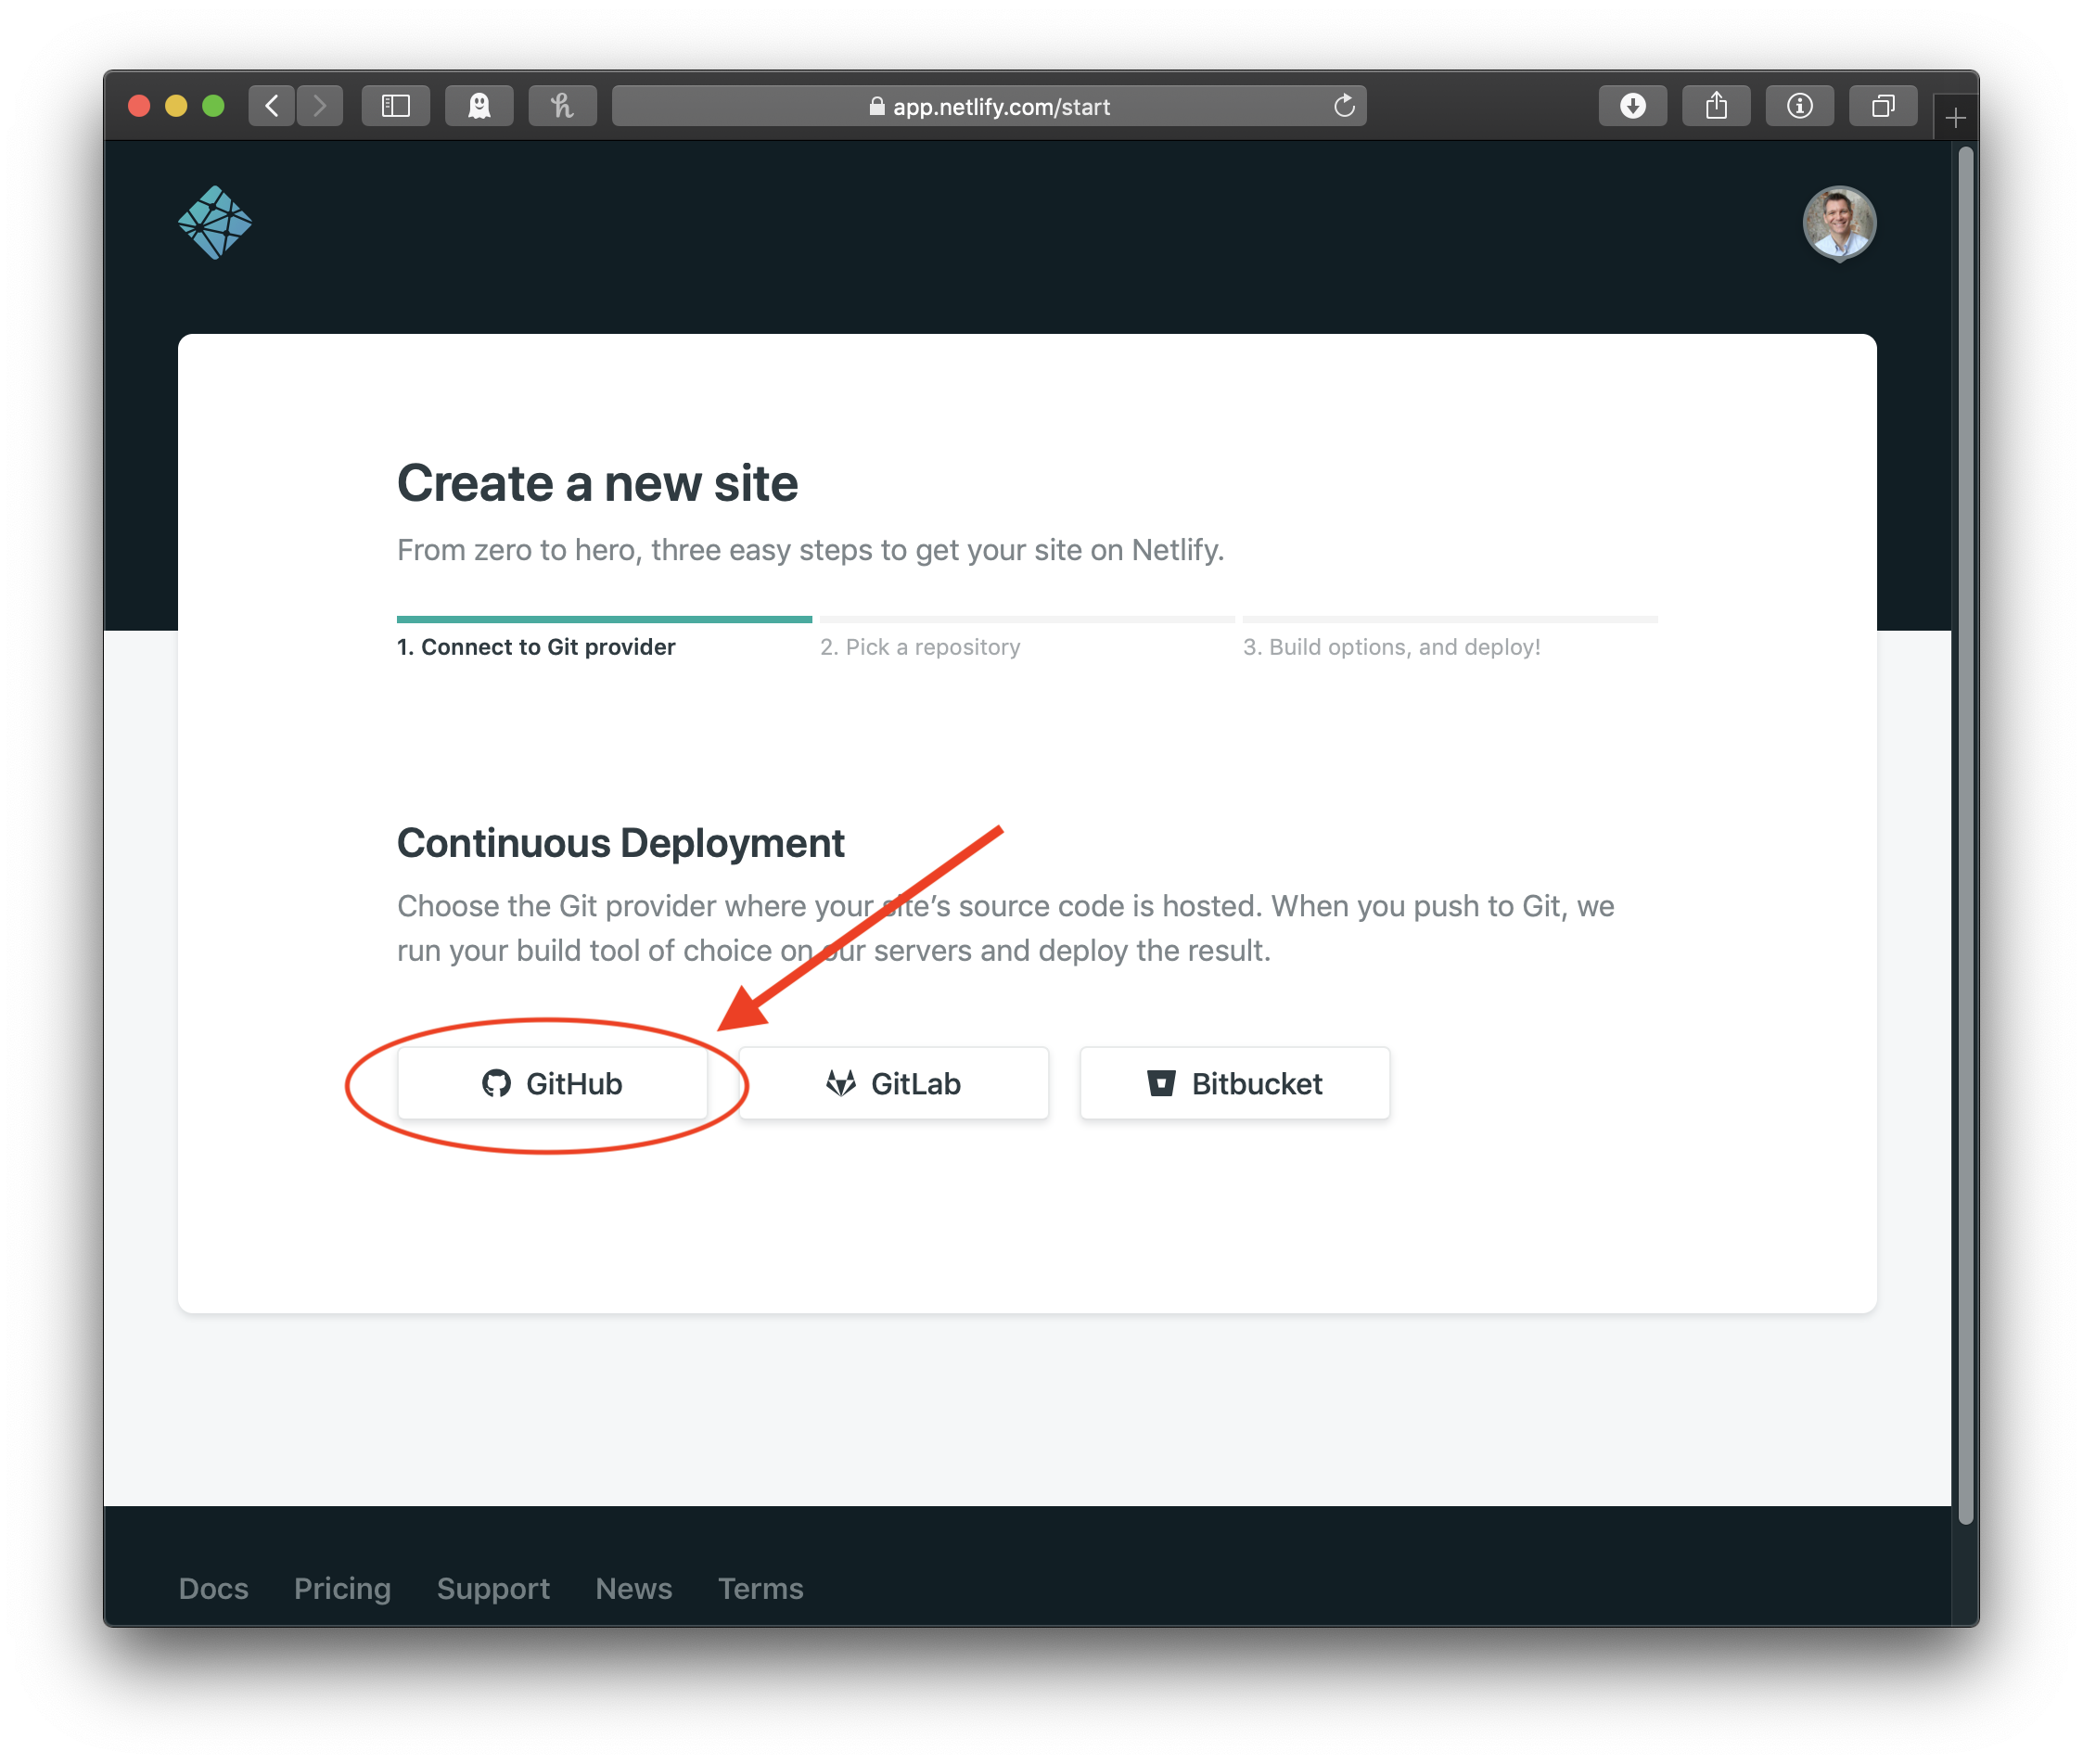
Once you have your website looking good on your own machine, you’re ready to get it online. Go to Netlify, which has a good free tier, and hit the button to sign up for an account. Choose to sign up with your GitHub account.
After you click through the sign up process, hit the button that says “New site from Git.” On the next page, under the “Continuous Deployment” header, hit the GitHub button.
Then, after an authorization from GitHub that should just pop up and dismiss itself, you’ll get to choose the repo you want to publish. That would be the one with the name you chose in the very first step of building your site . . . I told you to remember that name!3
Finally, you have to specify the build settings. For the build command, enter “hugo”. For the publish directory, enter “public”. The branch to deploy is “master”. Hit the button to deploy the site, and that’s it. Your site is online!
Changing the Domain Name
By default, Netlify will provide your website with some random address (for cmcr-class, I got boring-mayer-5d40c1.netlify.com). There are a number of ways to get a more presentable address. The quickest and easiest way is to simply rename the site on Netlify: if you’re not still there, log into Netlify and choose your site, then click on Settings. Under “Site details,” you’ll see “Site information” (the first bit of which will be the “Site name,” which in turn should still display that random address Netlify assigned you). At the bottom of “Site details” is a button labelled “Change site name.” Clicking there will let you choose a different subdomain, that is, all the stuff before .netlify.com. As long as no one’s beat you to it, you can have pretty much any name you want, so definitely do this.
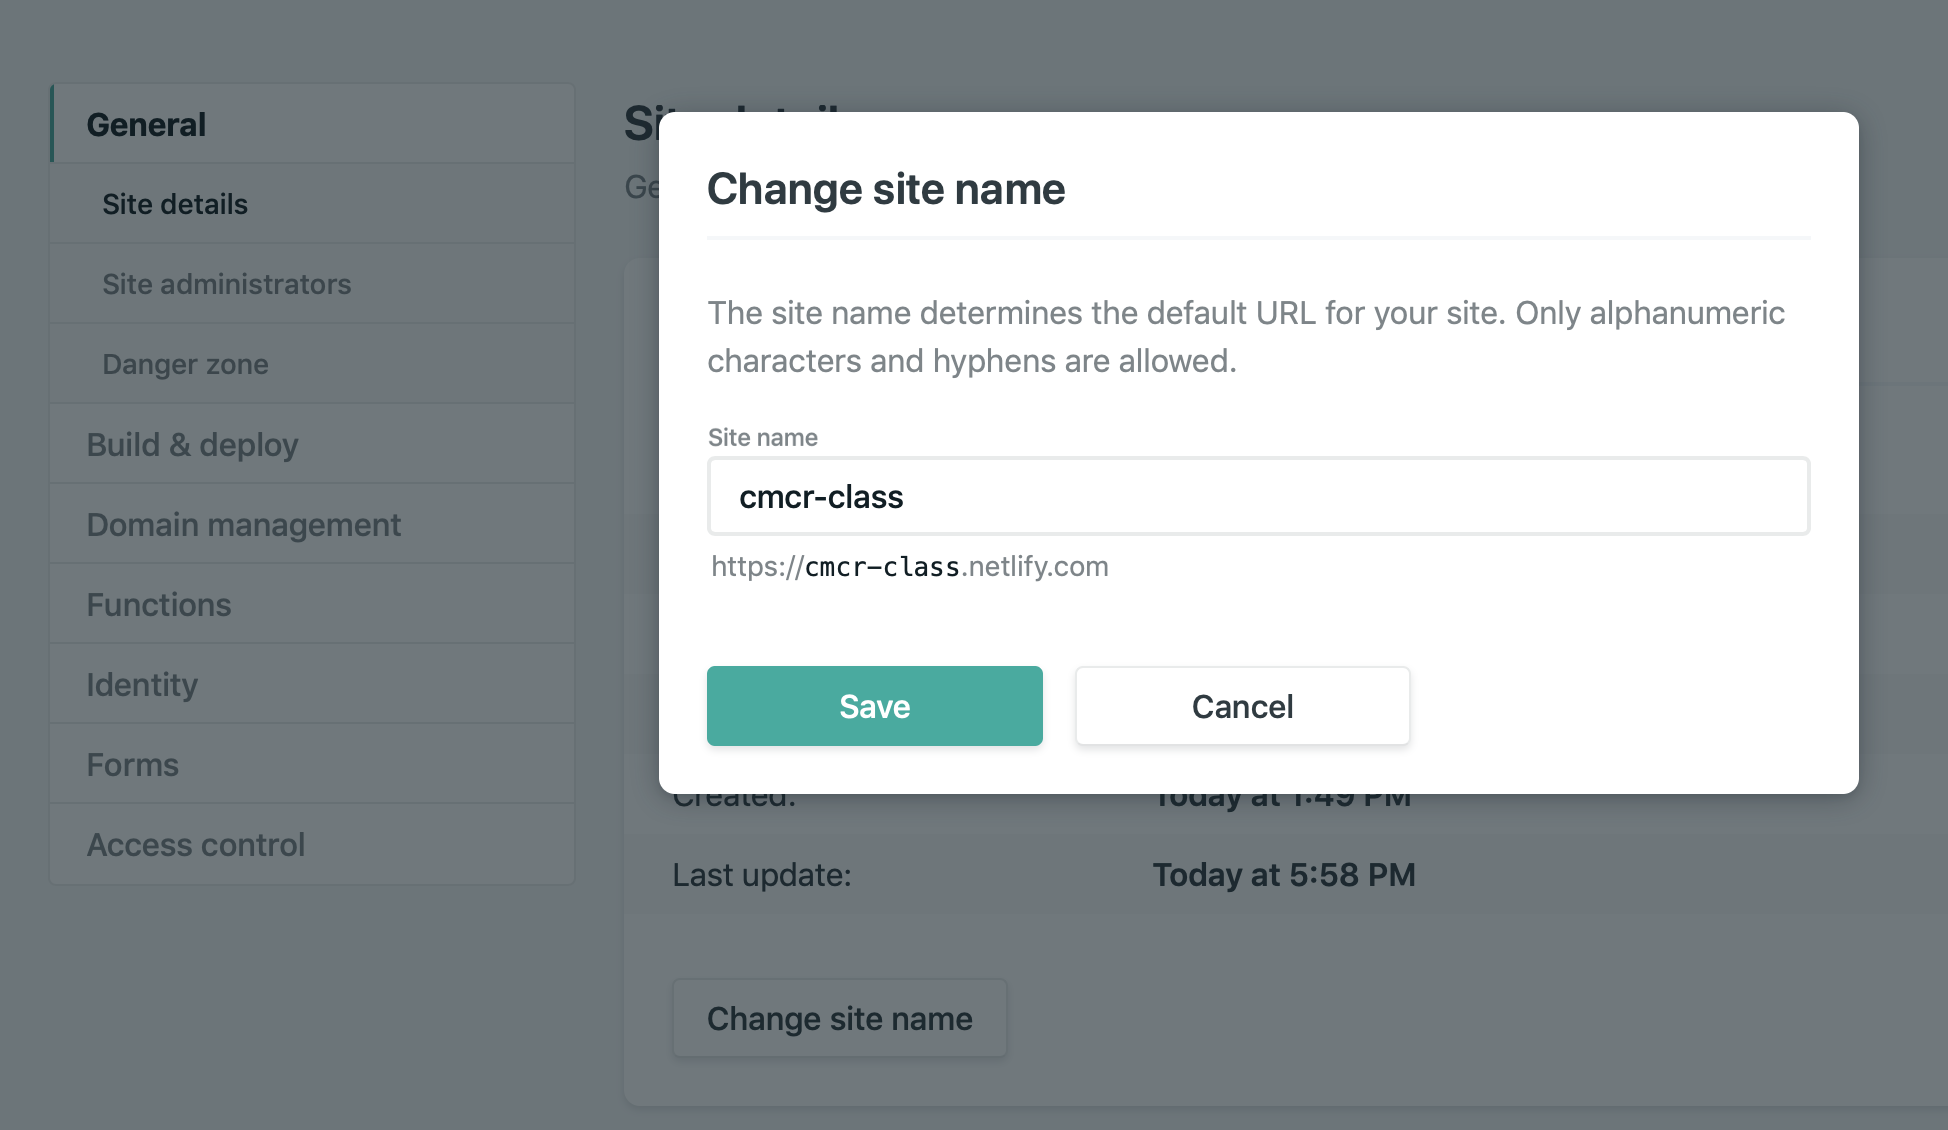
screenshot of renaming the cmcr-class site on Netlify
Your next step up in customization—requiring only a bit more effort and no more expense—is to get a free rbind.io subdomain from RStudio. Submit the request form (cleverly disguised as a GitHub issue) and wait for one of the extremely good-hearted volunteers who provide this service to get back to you. For me, this only took about an hour, if that even, but if it takes longer, please be patient. Follow the directions in their response (#1) to reconfigure Netlify to use your new custom rbind domain. When you do this, Netlify will warn you that rbind.io is owned by someone else or some such. Don’t panic. You knew that already; you’re not stealing it. Just click through. It’ll be fine.
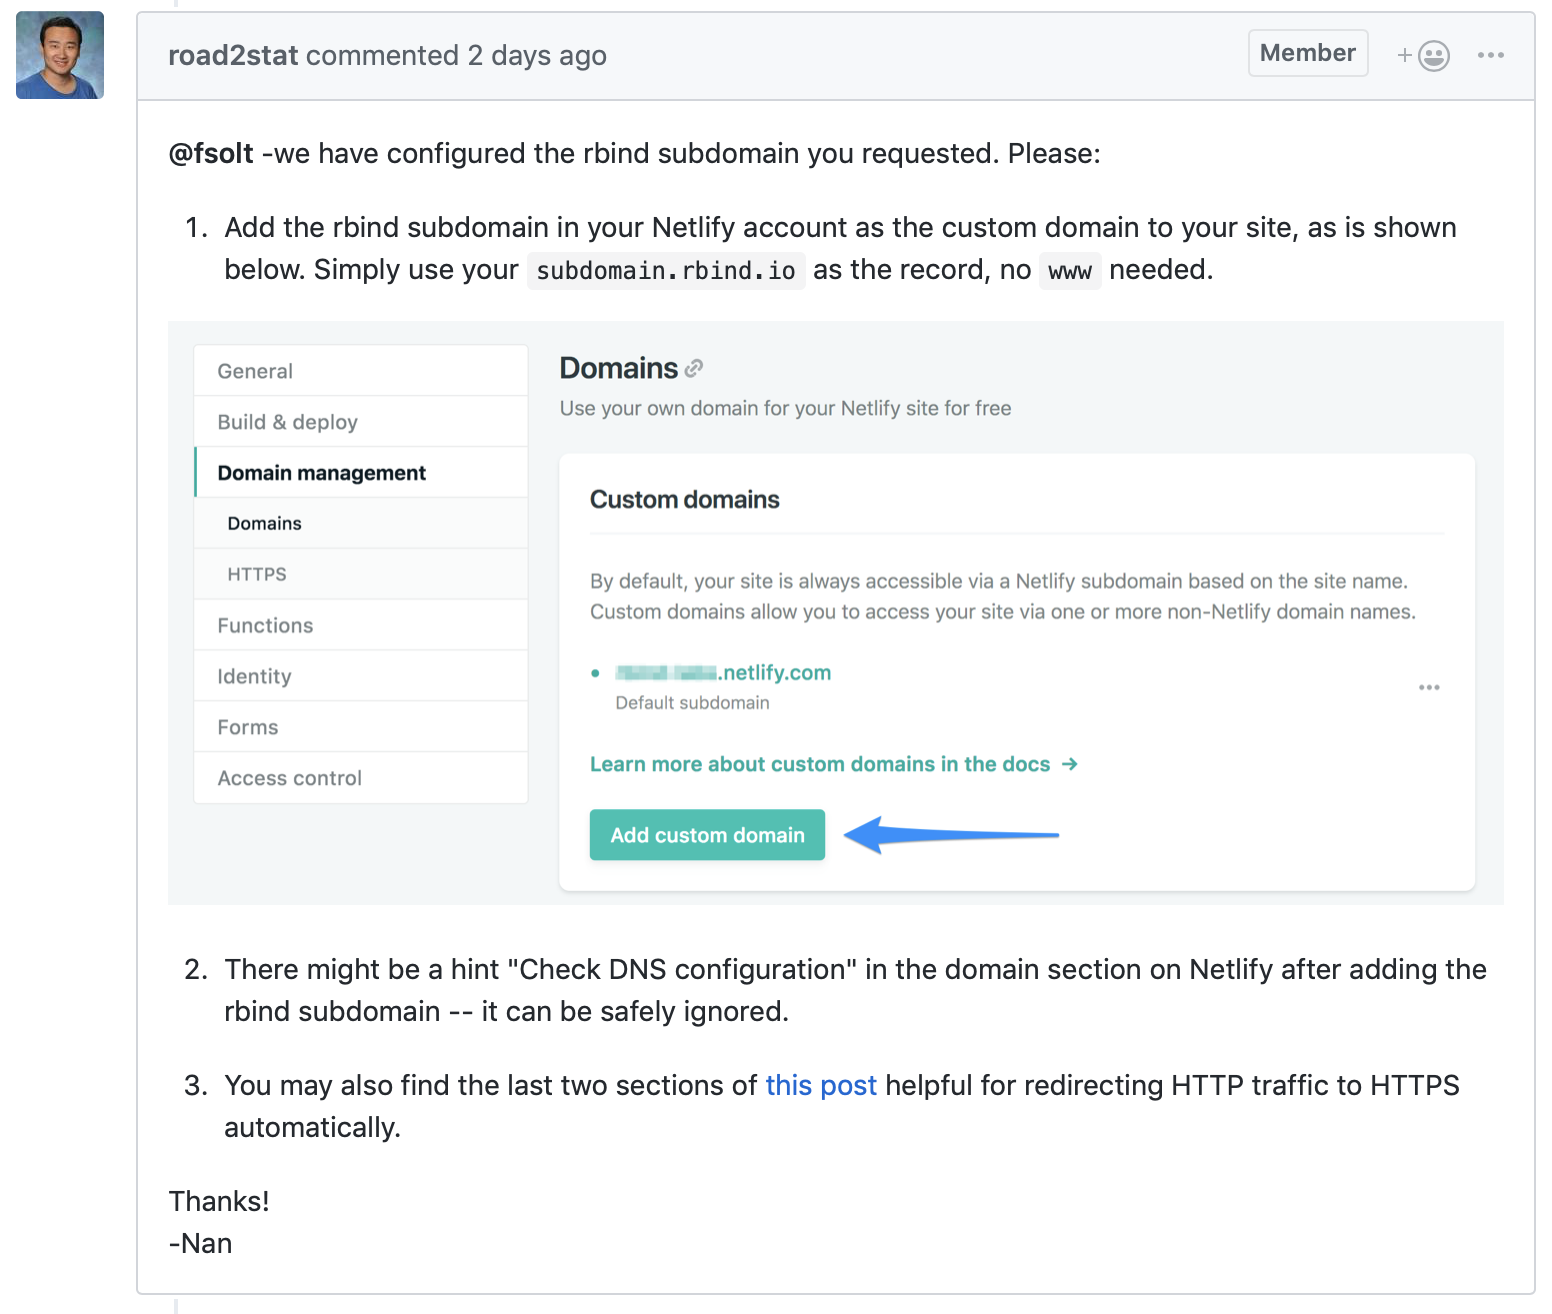
screenshot of rbind.io response
Yep, I got the “Check DNS configuration” hint from Netlify after adding the rbind subdomain (#2). And, yep, I ignored it. Easy. Here’s the tl;dr on #3: create a plain text document in the project directory for your website called _redirects with the following contents:
http://cmcr-class.rbind.io/*    https://cmcr-class.rbind.io/:splat  301!
https://cmcr-class.netlify.com/*  https://cmcr-class.rbind.io/:splat  301!
Be sure to swap out cmcr-class for whatever you named your subdomain, of course. The first line redirects any nonsecure HTTP links to your site to secure HTTPS links. The second ensures that anyone who happens to try to visit your site via netlify.io gets redirected to your preferred rbind.io address so that all of your visitors will have the same address for any given page. And then you’re done.
The last choice, if an rbind.io subdomain isn’t custom enough for you, if you just need the ultimate in domain name customization, you can (wait for it) buy a custom domain name. Custom domains are generally pretty cheap, up to maybe $10 a year, and they require a bit more configuring, but don’t let that scare you off: as long as you choose your domain reasonably carefully, you’re only going to have to do this work once. Directions from Netlify are here, and the company you buy the domain from will likely have directions for you too.
Whatever level of customization you choose, go back now to your config.toml file and on the first line, put your new address in as the baseurl.
You can add other bells and whistles, like Google Analytics or Disqus comments, pretty easily with blogdown, too. To explore all the details of the package, see Xie, Yihui, Amber Thomas, and Alison Presmanes Hill. 2017. blogdown: Creating Websites with R Markdown. CRC Press. Having a website is an important way of sharing your work, every academic should have one, and with blogdown it’s easy to set up and maintain your own. Let me know when your site is up!
David also just gave a keynote talk at rstudio::conf 2019 titled “The Unreasonable Effectiveness of Public Work” (slides , video) worth checking out, too.↩︎
I really recommend you include your name in the filename, rather than just calling the file
cv.pdflike Gosset’s. On the off chance someone excitedly downloads your CV to show to their colleagues as just the sort of person who should be hired, you don’t want to force them to pause and rename the file before forwarding it to the hiring committee. The moment might quickly pass, after all. If that hypothetical is too outlandish, you should instead view it as a specific case of the general rule that file names should convey useful information.↩︎Of course, you could just read it off of the title bar of your RStudio window.↩︎